The Autodesk Vault Professional BOM is generated directly from the Woodwork for Inventor BOM generator. The commands for transferring BOMs to Autodesk Vault Professional and other controls related to Autodesk Vault Professional integration only become available when the current project in Autodesk Inventor is of Vault type. In this case, a login button will be activated in the BOMapp dialogue to open the login dialogue.

Vault login button

Vault login dialog
1.Authentication method. BOMapp uses Autodesk Vault login methods, so you can choose between three login methods:
a.Standard – Autodesk Vault login
b.Autodesk Authentication – login with Autodesk credentials
c.Windows Authentication – login with your Windows login credentials.
2.User Name
3.Password
4.Server – the address of the Autodesk Vault server to which you are connecting.
5.Vault – the name of the Vault on the server, selected from the drop-down menu.
After a successful login, the “Commit Items to Autodesk Vault Server” button will appear in the main window of BOMapp and the user who is logged in to the Vault will be displayed at the bottom of the window.

Logged user and commit items button
Clicking on the “Commit Items to Autodesk Vault Server” button will upload the data to the Vault server after all Mapping procedures have been completed.
To start working with Autodesk Vault integration commands in the Woodwork for Inventor BOM generator, you first need to connect to the Autodesk Vault server.
To prepare the Woodwork for Inventor BOM generator for transferring data to the Autodesk Vault Professional system layer (Item Master), you need to:
Autodesk Inventor can categorise the components of an assembly to be created in terms of BOMs. I.e. a component can be Normal, Purchased, Inseparable, Phantom and Reference. The Woodwork for Inventor extension, when assigning own materials to Autodesk Inventor parts, creates additional information that allows Autodesk Inventor to categorise the component in a different way. I.e. the Woodwork for Inventor component can be identified in the BOM as: ▪Assembly and Part – a component of an assembly or part: ✓Assembly – component of an assembly ✓Part – normal part ✓Composite Part ✓Purchased Component ✓Sheet part ✓Sweep Part – stretched profile
Moreover, a part of furniture from the point of view of Woodwork for Inventor is itself an assembly which consists of: ▪Workpiece, which is subdivided into subcategories: ✓FillWorkpiece – fill workpieces, which can be: •Composite Workpiece – a composite workpiece bonded together from individual parts •Multilayer Workpiece – a workpiece of multilayer material •Solid Workpiece – solid wood workpiece •LaminatedWorkpiece – laminated board workpiece •Board Workpiece •Rod Workpiece – rod or profile workpiece •Desktop Workpiece
✓CoverWorkpiece – cover workpieces, which can be: •Veneer Workpiece •Edge Band Workpiece •Paint Workpiece
It is up to the user to decide how accurately they wish to categorise their BOM items. Is it enough for them to know that the item is a Workpiece or do they want to know that it is a Fill Workpiece or a Cover Workpiece? Or maybe they need an even finer subdivision, where they want to know that the filler material is solid wood or board, etc. Additional categories of BOM items are created based on the user’s decision.
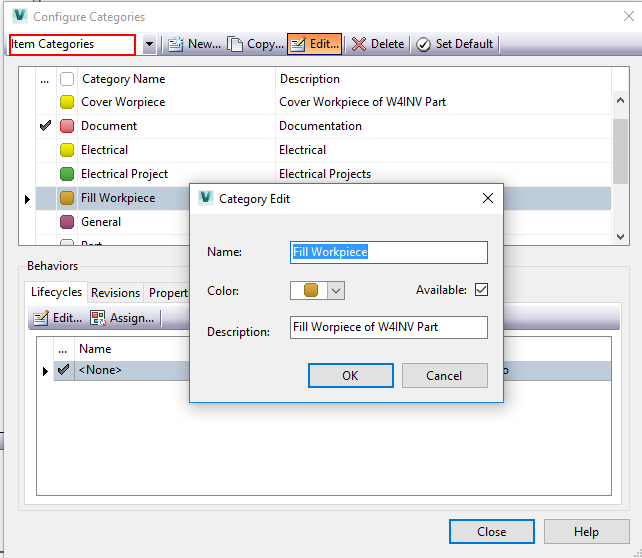
Let’s say we configure a connector so that we only need to know that the entry is a Part or an Assembly, and the workpieces are only categorised into filler and cover workpieces. So we create a category via the Autodesk Vault Professional Category Management dialogue: Tools -> Administration -> Vault settings -> Behaviors -> Edit and Manage Categories -> Categories
In this dialogue, you can create and edit the required categories of BOM items. In our example, we create categories: ▪Assembly – component of an assembly ▪Part – normal part ▪Purchased – purchased component ▪Fill Workpiece ▪Cover Workpiece
|
For BOM items, we create additional fields in the same way as we created them for the file card. The only difference is that these data fields must be associated with BOM items. If a data field (Property) is applied to both files and BOM items, such a data field can be associated to both categories simultaneously. In our example, such field is “Length”, because length is needed as a parameter in the file card. In addition, the length appears as a characteristic of the part or in the workpiece description. Thus, the fields created for the file card can additionally be associated with our additional categories (see above). |
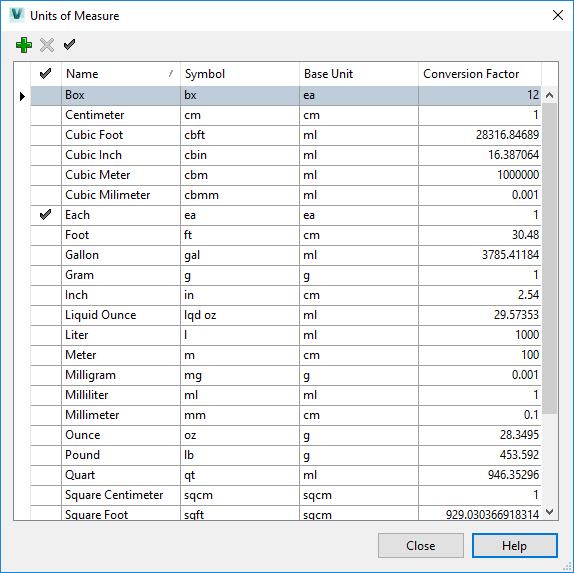
Depending on the type of material, Woodwork for Inventor displays the quantities in the units in which the material is measured. For example, a board is measured in square meters, a desktop in meters, etc. Autodesk Vault also allows you to use different units of measurement to specify quantities. By default, Autodesk Vault provides base units. If some units are missing, additional measurement units can be created, which are expressed in base units. The Woodwork for Inventor extension operates in the following units: ▪Milimeter, Square Milimeter, Cubic Milimeter ▪Centimeter, Square Centimeter, Cubic Centimeter ▪Meter, Square Meter, Cubic Meter ▪Inch, Square Inch, Cubic Meter ▪Foot, Square Foot, Cubic Foot
You must make sure that the corresponding units are also present in the Autodesk Vault unit list. The management of measurement units is carried out through the administration of Autodesk Vault category units:
Tools -> Administration -> Vault Settings -> Items -> Configure Units -> Configure
For more information on how to configure measurement units, see the Autodesk Vault Help. |
The mapping of categories between Woodwork for Inventor and Autodesk Vault Professional BOMs is done in the BOM generator. The BOMapp settings are opened and, if the user is logged into the Vault system in the BOMapp environment, the Vault settings menu will be activated and the Mapping will be performed.
 Vault settings menu
 Vault categories mapping
|
To map Woodwork for Inventor and Autodesk Vault units, open the BOMapp BOM generator settings and map units in the Units tab.
 Vault Units mapping |
|
To map the data exported by Woodwork for Inventor to Autodesk Vault data, the Properties tab is activated and property mapping is performed by clicking the "+Add Property" button. Select the "Properties" tab and write down the Woodwork for Inventor BOM keywords on the left-hand side. On the right, from the drop-down list, select the data field into which the BOM value retrieved by the keyword is to be entered.  Mapped keywords and Vault properties
|
After these steps, Woodwork for Inventor is ready to be delivered and Autodesk Vault Professional is ready to accept the generated Woodwork for Inventor BOMs. To generate BOMs in Autodesk Vault, select the command.
Commit Items to Vault server
- Commit Items to Vault Server
Important!
It is recommended to perform a Check In of the designed product to Autodesk Vault before importing the Woodwork for Inventor BOM into Autodesk Vault. In this case, each BOM item will be associated with the files that belong to that item. This can be a model of a part or assembly, a drawing of a part or assembly and a CNC program. This allows users of design information (technologists, manufacturing workers, etc.) to quickly access the information they need to organise and run production.

BOM item with associated files
A common error that causes incorrect file association is the fact that the correct Working Directory was not set in Autodesk Vault at the time of file inclusion. In this case, the Woodwork for Inventor BOM generator is unable to find the associated files and issues a message to that effect. Deleting the Autodesk Vault files in this state, modifying the working directory and adding the product back to Autodesk Vault will resolve the situation.
Exporting and importing mapped properties into Vault
In order to ensure smooth use of the Vault system, all users need to synchronise their project structure and follow common working procedures. In addition, these users need to synchronise their BOMapp Autodesk Vault settings so that the correct categories are assigned and properties are recorded during export. These settings, which are described at the top of this page, can be managed manually, but having to fill them in at each workstation can lead to errors and significant time costs.
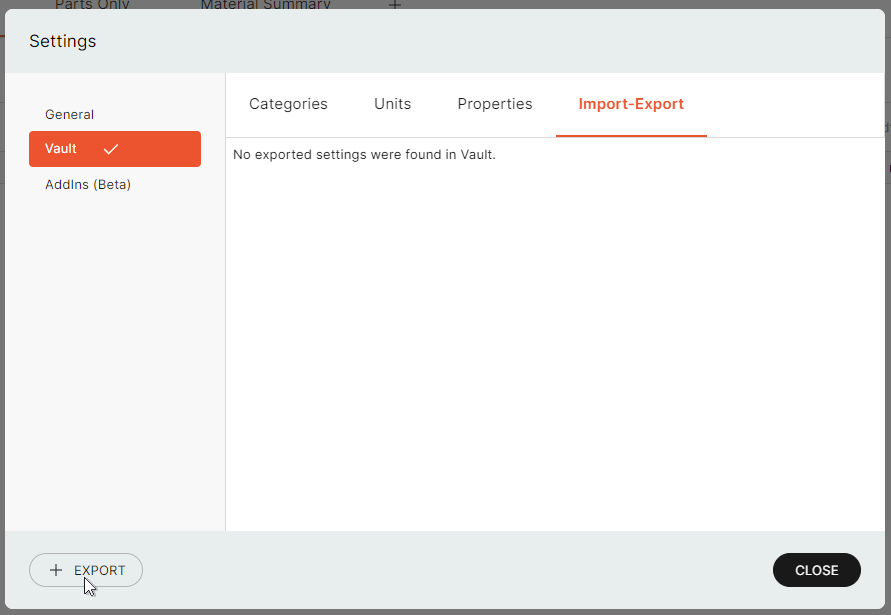
For a simpler and faster configuration of workstations, a tool for importing and exporting settings has been developed, which allows you to create a special file and place it in the Autodesk Vault project space (Project Explorer). After the user or CAD administrator has configured BOMapp and made it ready to work with Autodesk Vault, they need to go to the "Import-Export" tab, where they can see the configurations of the BOMapp settings that have already been created and uploaded to Autodesk Vault.
Exporting
It is executed on this tab by clicking on the "Export" button after the workstation has been configured.
In the window that appears, the user is allowed to enter the name of the exported configuration (required field) and, if the user wishes, they can enter a comment that will be visible in Autodesk Vault.

Export BOMapp Vauult settings
Importing
Important!
If users have previously used the Woodwork for Inventor BOM functionality for the BOM system and have exported settings to Autodesk Vault, they can import the same settings into BOMapp.
After the user exports Vault settings to the server, they are saved to the Autodesk Vault storage. These settings are stored in the main Autodesk Vault Project Explorer directory.

BOMapp Settings file in Autodesk Vault
The directory is read in the BOMapp environment. All users who are logged into the same Autodesk Vault storage see the settings files they can import.

Import Autodesk Vault Settings