As mentioned above, BOMapp can use plain text files as templates: e.g. the most popular is the MS Excel .xlsx format, but the system can also use other formats such as: LibreOffice .ods, .txt , .csv or .xml files. It can also work with Google Sheets documents if you use the JoinerCAD extension or the independent BOMapp application. To obtain the BOMs in a particular format, the template must be prepared in the same format. For example, if the user wants to receive the BOM in .csv format, the template must also be prepared in .csv format. If the template uses any macros in MS Excel template, it has to be saved as .xlsm file.
Creating a template when using spreadsheets (MS Excel, LibreOffice Calc, etc.)
Here are the rules to follow when creating a new template:
▪Each Sheet can contain a different type of BOM.
▪Only one type of BOM can be created per sheet.
▪The sheet can accommodate the description of several tables. Each table provides information specific to that type of BOM in its own way.
▪Keywords in all fields that describe the form of the BOM should be enclosed in brackets "{ }". The BOMapp interpreter takes this as a sign to look for the keyword operand between the brackets.
Below is an excerpt from one of the template sheets, which explains the basic principles of template design.
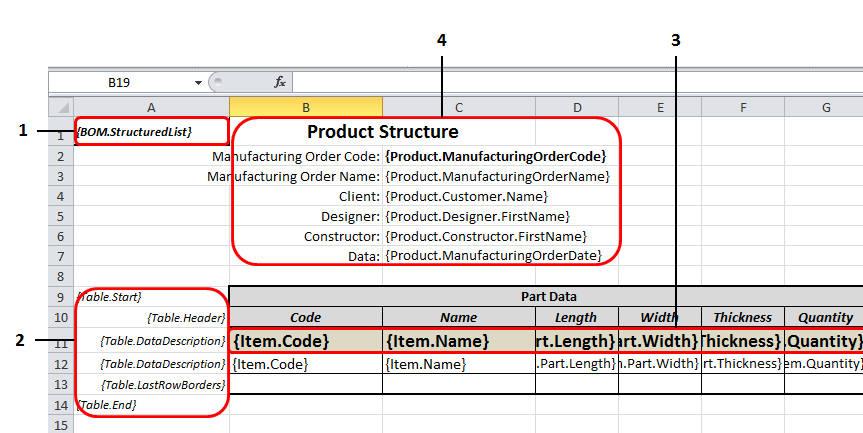
Column A of the template is for the descriptive part of the BOM.
1.Field A1 contains the type of BOM. The types of BOMs are the following:
a.BOM.StructuredList – a BOM containing information in a hierarchically structured form.
b.BOM.PartsList – a BOM containing only the parts lists of the product.
c.BOM.ItemsList – a BOM, where all model data items are presented just like in plain BOM.
d.BOM.MaterialSummary – a BOM containing summaries of the various forms of product materials.
e.Structured.Material.Summary – a BOM that summarises materials and their quantities by thickness.
f.BOM.MaterialsSummaryByProduct – a BOM containing a summary of the materials for the products of the first product level.
2.Column A contains the information defining the table. If it is a BOM.StructuredList, such a BOM can have only one table. For other types of BOMs, multiple, consecutive table template descriptions can be placed on the same template sheet. The table template description consists of a number of lines defining the following aspects of the table:
a.Table.Start – specifies the start row of the table. If the table type is not specified, it means that the type of this BOM will start from the general table, where the entries are not differentiated according to the material. If the table type is specified, it means that this table will output data related to the material type that describes the table. For example, in the BOM.PartLis,t the Table.Start.Board entry represents the start of a parts table containing a list of parts based on the board material.
b.Table.Header – specifies the row(s) which can contain the table header data.
c.Table.DataDescription (A11)– specifies the rows that contain the attributes of the entry that describe the information to be output to the table column. In a BOM.StructuredList, the row description may be repeated with a differently formatted Table.DataDescription row. The BOM generator interpreter interprets this as a description for formatting the data at the next level of the model hierarchy. The first line is for the top level, the next for the second level, and so on. This allows the user to create more expressive BOM forms that are easier to navigate.
d.Data Filter – optional parameter. The user can create a filter, which will allow exporting only the data that meets the <Data Filter> criteria as the BOM generator iterates through the model data tree. Filter creation principles are as follows:
({keyword1}=checked_value1 AND {keyword 2}=checked_value2....)
In order to have only exported Edge Band workpieces displayed in the {BOM.ItemList} BOM, the following BOM form can be provided:

e.Table.DataDescription (A12) describing keywords can be arranged on a MS Excel worksheet until the next {Table.DataDescription} keyword or the table end keyword {Table.End}. In other words, the data of the Item can be exported to more than one row in MS Excel.
 BOM template example |
 BOM generated result |
f.Table.LastRowBorders – this can describe the formatting of the last table, which may be different from the formatting of the rows of the regular table.
g.Table.End – the end of the table description.
3.This line contains the keywords of the output data in the desired order. These will output the corresponding data values required by the keyword in columns as they iterate through the model data.
4.The header of the whole BOM, which is formed from the data filled in at the time of filling in the header data. More information is available here.
The BOM generator will remove column A and output the information in the final BOM from cell A1 when generating the final BOM using the template.
The BOM generator, when interpreting the template data and forming the final BOM, also takes over the formatting of the template cell. This allows to increase the readability of the generated BOM.
The list of keywords used to describe BOM fields is available here.
Important!
When generating the MS Excel file, the BOM generator additionally analyses the rows of the MS Excel table to be created and their uniformity. If they are the same, they are collapsed into one row and the amount of the descriptive component is increased. This can be important when working with purchased products. For example, you have two different Autodesk Inventor components with the same part number and description. If their data rows match, then they will be collapsed into one entry in the MS Excel BOM. However, if the BOM template requires you to output a Custom iProperty value, which may be different for the above components, these components will be output on different rows.
Creating a template using a text document (.txt, .csv, .xml, etc. text files)
In order to make the BOMapp application as versatile and user-friendly as possible, we are introducing the ability to output files in text formats, which can be particularly convenient when the final BOM file needs to be processed by a machine, e.g. by a database interpreter.
The logic of creating a template for a text document is similar to that of a spreadsheet: keywords are replaced by the requested values, function keywords (e.g. {BOM.PartList}, {Table.Start.Board}, {Table.End}, etc.) are interpreted as command call or termination keywords, and after the requested action is performed, they are removed from the final result – the generated BOM.
A few rules to help you create the right text template:
▪Only one type of BOM can be created per file.
▪The sheet can accommodate the description of several tables. Each table provides information specific to that type of BOM in its own way.
▪The text is not editable, so if the user has placed a space character, a semi-colon, or the pressed the tab key before or after a keyword, the BOM interpreter will leave them in place, and only the value requested by the keyword will be changed.
Below is an excerpt from a text template, which shows the basic principles of template design. This file is saved as a simple .txt file and used as a template to generate the BOM.

Fragment of the text file template
Explanation by row:
▪1 – specifies the type of BOM you want to output.
▪6 to 11 – specify the Header information that will be activated in the final BOM. These lines are optional.
▪15 – specifies the material with which you want to render the details.
▪16 – indicates which row contains the table headers if they are required in the final BOM file.
▪17 – values for each desired column are output from the header in line with the header information.
▪18 – closes the table function and ends the work.
The final result when output to a text file is shown in the image below.

Final output of gererated BOM using text file for the template
Using JS in text templates
The BOMapp interpreter has a built-in option to use JS code in text templates, which allows certain manipulations of the generated data. For example, if the user wants to manually calculate the resulting area of a component (or workpiece) using formulas, he/she can perform a simple multiplication operation by multiplying the width and length of the component (or workpiece). In this case, the BOMapp interpreter will return the calculated values after simple mathematical operations. There is no limit to what you want to calculate, so the templates can be tailored to your individual needs.
Below is an example that illustrates the area calculation principles used to develop the JS.
The beginning of the text template describes the functions needed to perform the calculations. These functions are distinguished by the keywords {Script.Start} and {Script.End}.

JS Script snippet
Below the function descriptions are instructions on how the template itself should be output and formatted. Here, the user is free to customize the template according to their needs. The following example shows the output of a Part Number , a call to the program code with the {Script.Call()} keyword. Parentheses () contain arguments that are used in the calculation as in the case of a plain template – the keywords must specify the type of the BOM ({BOM.PartList}), the start of the output ({Table.Start}), the columns ({Table.DataDescription}) and the closing of the table ({Table.End}).
Using the constructed template to output the data, the result is as follows.

BOM Report genereated using JS snippet
Google Sheets integration (JoinerCAD and standalone only)
The BOMapp application can work with Google Sheets documents if the user has JoinerCAD or Standalone application running in standalone mode. In order to use this feature, the user will need to give the Woodwork Hive tool access rights to read and write to the user’s Google Drive account during the first run.

Google drive authorization window
If the user wants to work with Google Sheets documents, they need to:
1.Create a template in their Google Drive account.
2.Specify that template when exporting.
3.Specify the storage location of the derived BOM on their Google Drive platform.
.
Creating a template
The user can create the template in their Google Drive in two ways:
▪The first and easiest way is to load an existing BOMapp template onto your drive and save it.
▪The second way is longer – using the same principles as for a local e-reader, you can create your own template from scratch.
An example of a template excerpt uploaded to Google Drive can be seen below.

Google sheets template example