Creating your own Add-in |
This guide provides step-by-step instructions on how to develop add-ins for BomApp using .NET and C#.
To begin creating add-ins for BomApp on a Mac, there are several prerequisites that you need to have installed on your system:
.NET SDK (Software Development Kit): A set of libraries and tools that allow developers to create .NET applications and libraries.
Visual Studio Code (VSCode): A powerful and versatile code editor that supports a multitude of programming languages.
C# extension for VSCode: Provides C# support in VSCode, including features like IntelliSense, debugging, and code navigation.
C# Dev Kit extension for VSCode: Enhances the C# development experience in VSCode with additional tools and features.
Once everything is installed, launch Visual Studio Code and open the terminal in it. You can do this by going to the top menu of VSCode and selecting 'Terminal > New Terminal'. In terminal window run the following command to create a new class library project:
dotnet new classlib -n YourLibraryName
This command creates a new .NET class library with the name 'YourLibraryName'.
After setting up your development environment and creating your new project, the next step is to open the created project for editing. From the the top menu of VSCode select 'File > Open Folder...'. In the dialog that appears, locate and select the folder where your 'YourLibraryName' project was created. This will open the folder in VSCode, allowing you to view and edit the project files. Now, you're all set to start developing your BomApp add-in.
Once your YourLibraryName project is open in Visual Studio Code, you need to add a reference to the 'BomApi.dll' in c# project file. This file defines the project settings and dependencies. In the Explorer pane of VSCode, locate and select 'YourLibraryName.csproj' file. Add the following lines inside the <Project> tag:
<ItemGroup>
  <Reference Include="BomApi">
    <HintPath>$(LocalAppData)\Celi APS\BomApp\SDK\BomApi.dll</HintPath>
  </Reference>
</ItemGroup>
<ItemGroup>
  <Reference Include="BomApi">
    <HintPath>/Applications/BomApp.app/Contents/MonoBundle/BomApi.dll</HintPath>
  </Reference>
</ItemGroup>
This code creates a reference to the 'BomApi.dll' file. This reference is necessary for your add-in to interact with the BomApp application. Save the `YourLibraryName.csproj` file after adding the reference.
To implement the 'IBomAddIn' interface in your project, you need to add the necessary code to a .cs file. This interface defines the contract that your add-in must adhere to in order to interact with the BomApp application.
Here's an example of how you can implement the 'IBomAddIn'` interface. You can put the following code to 'Class1.cs' file or create a new .cs file and put it in there.
using System.Diagnostics;
using System.Text;
using CeliAPS.BomApi;
using CeliAPS.BomApi.Data;

namespace YourLibraryName;

public class BomAddIn : IBomAddIn
{
    public async Task Init(BomApp bomApp)
    {
        var bom = bomApp.Bom;
        var htmlDocument = GenerateHtmlDocument(bom.Children);

        // Save the HTML document to a temporary file
        var tempFilePath = Path.GetTempFileName() + ".html";
        await File.WriteAllTextAsync(tempFilePath, htmlDocument);

        // Open the file in the default browser
        Process.Start(new ProcessStartInfo
        {
            FileName = tempFilePath,
            UseShellExecute = true
        });

        // Delete the temporary file after a delay to ensure the browser has had time to load it
        await Task.Delay(5000);
        File.Delete(tempFilePath);
    }

    public string GenerateHtmlDocument(IEnumerable<ItemOccurrence> root)
    {
        var html = new StringBuilder();

        html.AppendLine("<html><head><style>");
        html.AppendLine("body { font-family: Arial, sans-serif; }");
        html.AppendLine("table { border-collapse: collapse;}");
        html.AppendLine("th, td { border: 1px solid black; padding: 0 1rem; text-align: left; height: 20px; font-size: 12px; }");
        html.AppendLine("th { background-color: #eb542f; }");
        html.AppendLine("</style></head><body>");
        html.AppendLine("<table><tr><th>Code</th><th>Name</th><th>Quantity</th></tr>");

        AppendTableRows(html, root, 0);

        html.AppendLine("</table></body></html>");

        return html.ToString();
    }

    private static void AppendTableRows(StringBuilder html, IEnumerable<ItemOccurrence> children, int depth)
    {
        foreach (var itemOccurrence in children)
        {
            var code = itemOccurrence.Item.Code;
            var name = itemOccurrence.Item.Name;
            var quantity = itemOccurrence.Quantity;
            html.AppendLine($"<tr><td style='padding-left: {depth+1}rem;'>{code}</td><td>{name}</td><td>{quantity}</td></tr>");
            AppendTableRows(html, itemOccurrence.Item.Children, depth + 1);
        }
    }
}
The provided code generates and opens in defaut browser an HTML document representing a Bill of Materials (BOM) report for the currently opened data in BomApp.
Now that you have implemented the 'IBomAddIn' interface in your project, the next step is to compile your project into a DLL file that can be used as an add-in in BomApp.
To do this, you need to run the following command in the terminal:
dotnet build
This command will compile your project and create a DLL file.
After the build is successful, the path to the compiled DLL file will be displayed in the terminal output. You can add that DLL file in the BomApp settings. Remember to restart the BomApp and rebuild your project after each change to ensure that BomApp is using the latest version of your add-in.
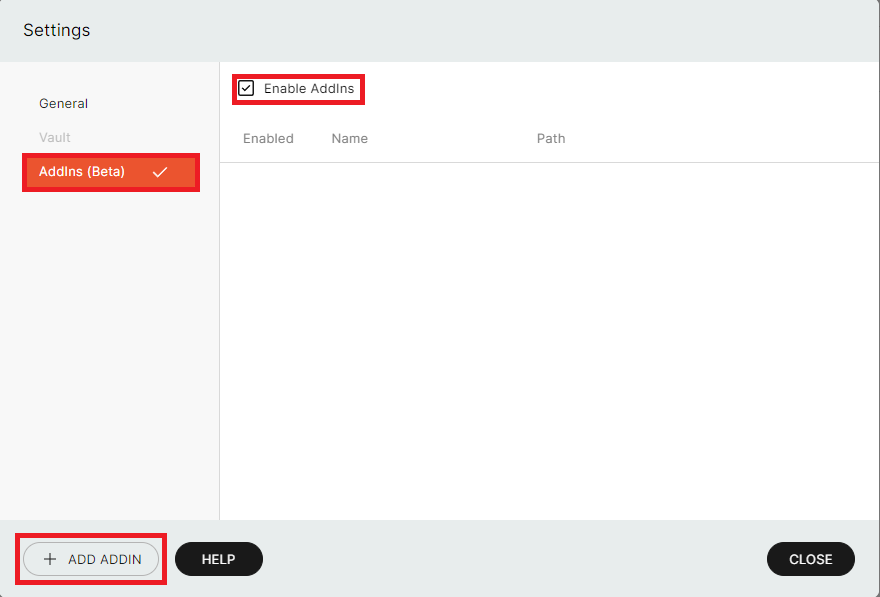
To add your AddIn using BOM app, first go to the settings dialog and then click on the AddIns.
Make sure Enable AddIns check box is checked.
Afterwards click ADD ADDIN button.

After clicking the button you will be able to input your AddIn name and specify where the AddIn dll is located.

After entering the name and specifying where the AddIn is locaed using the BROWSE button – click SAVE.
Now in BomApp open the '.wbom' file or generate BOM from a CAD application and run the command from 'Run Addin' menu in BomApp
It's important to note that if your add-in uses any third-party libraries, these must be copied to the output directory, otherwise your add-in may not run correctly. To ensure these libraries are copied, you should add the following lines to your '.csproj' file:
<PropertyGroup>
  <CopyLocalLockFileAssemblies>true</CopyLocalLockFileAssemblies>
</PropertyGroup>
<Target Name="CopyThirdPartyLibs" AfterTargets="Build">
  <ItemGroup>
    <Libs Include="$(OutDir)\runtimes\win\lib\net8.0\*" />
  </ItemGroup>
  <Copy SourceFiles="@(Libs)" DestinationFolder="$(OutDir)" />
</Target>
This configuration will copy all third-party libraries to the output directory after the build process is complete. Please note that the line <Libs Include="$(OutDir)\runtimes\win\lib\net8.0\*" /> may differ depending on your environment and the .NET version you are targeting
