One of the most important attributes of a product is its BOM. Flexible presentation in the desired format is particularly relevant for Workflow integrations, and one of the functions of our Extensions is the automated generation of Reports, which contain all the information needed to launch the production of the designed product. The report generator presents its information in a variety of text documents, one of the most popular being MS Excel. Typically, users and companies create one or more BOM templates, which are then published/distributed for further use via corporate networks or cloud storage.
For the BOM generator to function, the computer should have a spreadsheet editor (e.g. MS Excel, LibreOffice, etc.) to configure and open BOM templates. However, if the user has a JoinerCAD or Standalone license, they can also use the Google Sheets functionality, which allows them to upload templates to cloud storage and edit them.
The BOM generator allows to flexibly organise the output data into different forms, which are described in Templates. The templates we provide are MS Excel files containing the keywords that are used to build the final report tables. The user can easily and simply modify these templates and adapt the information generated to their needs.
The Woodwork for Inventor installation file contains BOM templates. They are available on:
▪C:\Users\Public\Documents\Woodwork for Inventor\\BOM Templates
The JoinerCAD and Standalone installation files also contain BOM templates. They are available on:
▪Windows OS - C:\Users\Public\Documents\WW Data\BOM Templates
▪macOS - /Users/Shared/WW Data/BOM Templates/
If the user is logged in to the BOMapp environment, they can see the same templates uploaded to our cloud storage. The templates in this storage are always promptly updated. What’s more, users can also upload their templates to cloud storage and store them there. This way, they will no longer have to worry about synchronising templates if working across several different workstations.
Choosing a template
At the bottom of the dialogue, next to the "Export" button, there is a drop-down menu where users can find a list of the last used templates and open the template manager.

Select template command
1.A drop-down menu storing the last used templates. At the front, it tells you where they were used from, either the path of the computer (C:\Users\Public...) or one of the tabs in the cloud storage (System; Personal, etc.)
2.Open new template – button that opens the template manager dialogue.
3.Active template – shows the template currently in use and the path to it.
4.Edit active template button. Clicking on it will open the template for editing in the user’s default application. This feature is only available in the local application
Template Manager
When you open the template manager, you will see a dialogue where the number of tabs you see and their functions will vary depending on the Extension and the license you use. Below is a list of the maximum number of functions and what they do and, at the same time, what varies depending on the software and its license.

Template Manager
1.Template storage location selector.
2.A table of saved templates and their management tools.
3.The name and location of the template used.
4.Upload button.
Storage location selector
Here, the user can see the locations available to them from where and to where the templates can be stored. The locations that are visible to the user may vary depending on the extension and the license you have. For example:
A.The following locations are available to Woodwork for Inventor users (by logging into the BOMapp):
▪System – only for downloading the templates provided, users cannot upload anything.
▪Local – only in the local application.
▪Personal.
B.JoinerCAD and Standalone license holders (with BOMapp):
▪System – only for downloading the templates provided, users cannot upload anything.
▪Local – only in the local application.
▪Personal.
▪Company – the menu visible to users in the same Subscription license basket. If one user uploads a template, everyone in the same subscription basket will see the templates uploaded there.
▪Shared with me – if templates have been shared via the Share function, the user can see all these shared templates in one place.The Share function is opened via the context menu by selecting the Share command (see the preceding figure – Template manager). It will ask for the Autodesk IDs (email addresses) of the users you want to share templates with. Once they are entered, the templates will be linked to these users.
▪Google drive account.
Table of templates
In the table, users can choose to use a specific template or, via the context menu, select the Download, Share or Delete functions.
Name and location of the template in use
Here, the user can see which template they are using and from which tab it was taken. Also, if it is a local template, you can specify where on the computer the BOMapp should search for templates.
 Cloud template selection |
 Local template selection |
Connecting and using Google Drive (JoinerCAD and Standalone only)
Users who want to export their templates and final product BOMs to the Google Drive can use the functionality provided to connect and link the BOMapp application to their Google Drive.
To connect:
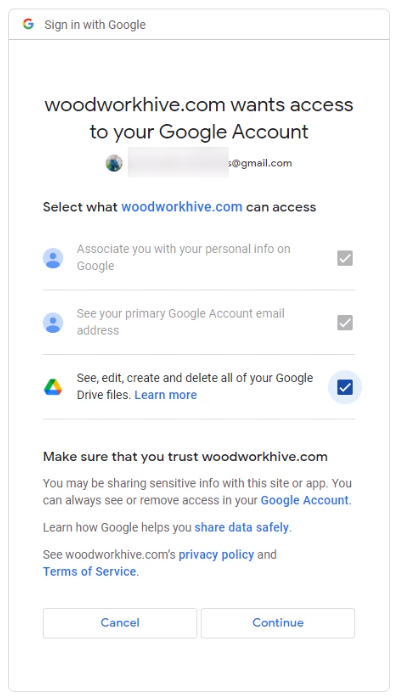
1.Select the Google tab and tick the box to accept the terms and conditions (T&C).

Sign in
2. In the browser window that opens, specify the email account that will be used to connect to Google services and grant the Woodwork Hive service access rights.
3. Return to BOMapp, where the user should see their Google Drive locations and files.
Templates in Google Drive
Instructions for a user who wants to use the Google Sheets environment and templates:
▪Sign in to your Google Drive account in your web browser.
▪Create a directory where the BOMapp templates will be stored.
▪Place the BOMapp templates (or create your own and place them) in this location, open them in Google Sheets Manager, save and close them.
▪In the BOMapp template manager dialogue, specify the template you want to use.

Google Drive template selection
▪Export the BOM to Google Drive using this template. During the export, BOMapp will ask you to specify the location where you want to save the generated BOM.

Select location for the output file
Final view in Google Sheets

Exported BOM to Google Sheets